Thought I would post this on a seperate blog ... because it is popular, and to make it easy to find.
1) "My" Nikon D700 camera settings (which I have posted before, fyi)
This is "evolving" but here you go:
* First: and most importantly I put ALL my favorite D700 camera "Menu" items on the ... "My menu" , menu (did I say that correct?) ...
this stops me from having to dig deep into the confusing list of menu items (so, now I have no clue where they are in the real menus lol)
* I LIST them in my must used order ... currently
* Second: and very important for me ... I tweak/customize some of the wheels and buttons to work better for "me". I will START with that, because it is the most used tweak on a shoot.
1) f9 reverse rotation = ON: so the comp wheels work in the right direction, * Change main/sub = ON ... both these changes helps me in my most used mode "A" Aperture priority ... allows me to change the Aperture with the BACK wheel ( I like changing the Aperture while my finger is on the shutter ) , and EV comp with a press of the EV button and BACK wheel. OR I can EV comp with the Front wheel (with no EV button press ... needs a b4 change)
* Menus and playback = ON
2) f2 Multi selector center Button : one of my most used feature ... * Shooting Mode = Reset to bring back my AF point to the Center quickly , * Playback Mode = Zoom so on a "automatic" Review on the LCD after each shot , I can quickly / easily Zoom in to 100 % aprox on the shot , this also keeps it in Review mode , and not shut off. (of course you need to Turn ON "Image Review" in the Playback Menu as well)
* another Big Trick in this menu is to set Playback mode>Zoom on/off>MEDIOUM MAGNIFICATION (which is about 100%) ... you can also in playback with this center button zoom trick , roll thru your shots at this zoom , cool when you want to compare two seq. shots.
3) f4 Photo info/playback ... Info at Up/Down , and Playback Left/Right ... in Photo Playback this allows me to quickly scroll thru my Fav Info OR go back and forth on my images.
4) Relates to above : in the Playback Menu ... "Display mode" ... I have Focus point, Highlights checked ... "my" most used playback modes. note: I can still scroll thru and see a histogram, but because the Histogram is generated from the imbeded JPG (in the RAW file) , and that I ONLY shoot RAW ... the Histogram is only slightly useable ... Highlight Blinkys more useful imho in the RAW digital age, where you can push to the Right.
5) Have the Focus mode selector switch to S (single shot) , and the top left dial to CL (set at 5fps) ... caution: whenever you take the D700/D3 out of your bag , check this Focus mode selector - You will thank me latter. This switch moves sometimes.
6) Metering Selector to "3D color Matrix II" ... fancy for Matrix ... and adjust all my comps with that in mind. The D700 Matrix Metering is very consistent and predictable ... and that is the most you can ask for. I will put myself down as Loving it, so I use it all (most ) of the time. Well, whenever I can. :)
7) AF area mode selector : Dynamic Area AF ... Very Fast AF/Accurate, and great in Low Light. I am super happy with the AF on the D700 and the new f2.8 lens.
8) d4 CL mode shooting speed 5fps (CL is my default setting) (CH is 8fps) ... If, you are the Focus and recompose type ... this will create problems for you, because after each shot in CL the D700 does re-focus , so your AF point needs to be above your subject.
9) e1 Flash sync speed 1/320s (Auto FP) ... so anything above 1/250 is auto HSS Flash
10) f1 switch : both , so on a right move of the light switch BOTH the back LCD and the top lights up , so I can do a quick check on the settings via a large 3" LCD
11) f11 No memory card = Lock ... no memory card , no shooting ... note: default is unlock (not a good thing)
12) f12 Reverse indicators to - 0 + ... logical for me
13) a1 AF-C priority selection : Release + Focus
14) b4 Easy exposure compensation = ON ... this let's me comp the EV in A using the front wheel (this in combo with my other settings)
15) in the Set Up Menu , LCD Brightness set to -2 ... this will give you a more True Brightness of your shot on the LCD ... listed this last , but is very important imho ... you might have to play with this for your own Monitor and PP (Post Processing) style.
Now, on to my Favorite "MY MENU" choices: (IF, you leave it on My Menu ... the Menu button quickly goes back to it. "My Menu" on the D700 has eliminated my need to ever go into the regular menus :)
1) e3 Flash ctrl for built-in Flash ... Which actually has the controls for Flash Commander Mode CLS , Love it, Use it. I am a strobist CLS kind of guy :)
2) ISO sensitivity settings ... auto ISO is a great feature , but you just have to be careful with it. I probably change this the most ... with my default at ... base iso200 top end iso6400 (being that on a D700 the "Unity Gain ISO" is iso6400 the hint is the dial setting, even though "in camera" it can go higher ... anything else can be pushed processed from a RAW file in Post, with the same results) ...
* and the shutter at what I can handhold "specific" for the Shoot/Lens. This is best when the conditions are changing fast. Shadow and Bright as you turn.
I also must note: "whenever" Lighting conditions are tricky ... say, almost anytime after the Sun actually sets ... I Turn Auto ISO OFF , and set the iso manually (most of the time, anywhy)
3) e2 Flash shutter speed ... my default is 1/30 but that changes.
4) a8 AF point selection ... when speed in selection is important I use 11 point
5) a3 Dynamic AF area ... 9 pr 21 depending on things around target
6) a5 AF activation .. I need this then I want to lock a AF in MF ... then I turn AF-ON only. Something I do often.
7) a9 Built-in AF assist illuminator ... so I can quickly turn off and ON
8) c3 Self-Timer delay ... let's me set the sec ... can use this instead of a remote shutter
9) Active D-Lighting ... allows me to turn Off an ON ... because it does affect how you expose in A mode , and therefore underexposes the RAW file (and can create a slightly more noisy file). (I shoot RAW) ... but, even in RAW D-Lighting ON shows you better (via the imbedded JPG) what can be done with the RAW file, and fyi LR v2.6 at default DNG LR import is very close to the D-Lighting JPG but less noisy imho.
10) Focus tracking with lock-on ... this is for AF-C shooting if you need to change
11) Long exp. NR
12) Multiple exposure
* I also have Shooting Menu and Custom setting BANK listed ... but, have not really used this much yet.
*** So, there it is ... IF, you have any improvements, to MY Nikon settings ... or something I left out , that would be important to use ... let me know. email: rdhinc@hawaii.rr.com
and I will update this blog.
Hope this helps,
Ross Hamamura / www.RDHphoto.net
Monday, June 28, 2010


Thursday, June 3, 2010
Second Portrait Workshop by Tracy Wright Corvo JULY 25 SUNDAY
Because of the success of the first Protrait Workshop put on by Tracy Wright Corvo ... there will be another workshop on July 25 Sunday.
 Again sponsored by Hawaii Photo Rental http://www.hawaiicamera.com/ Hawaii Photo Rental LINK ... did you notice that ALL Workshop participants will get a 15% discount on lighting gear for one month?
Will be at the same location, studio f22.
7/7/2010 update: ONLY 1 more spot left open! ... wow, this workshop will be sold out again.
To REGISTER: Email Tracy at twc@tracywrightcorvo.com
The goal is to make this workshop "even" better. And have a few good models to shoot, Tracy assured me that there would be at "least" one model I might want to take out my camera and take a snap :) Ok, I am excited already ...
(again, this is not a level "two" version, next step ... that some have asked about)
On the strobist side :) ... that I am doing ... I will bring the "very" popular RadioPoppers JrX "studio" version this time (and hope to have everyone Hands-On with this Off camera Flash trigger) ... that should work on ANY DSLR body with a Hot Shoe. (and can control the power level of AB,WL,Zeus strobes with a RJ-11 jack) ... also, have a cool four flash softbox to show, FourSquare by Lightware LINK here for more info http://www.lightwaredirect.com/examples/index.html FourSquare LINK
And "might" demo the RP CUBES (time permitting) which allow you to control the power level of your (Nikon or Canon TTL) flashes on camera. (problem is my sb900's don't work with them lol ... you would think you could find some cheap sb800's , but noooo ... so far the Metz 48 AF-1 TTL seems to be a candidate, but the TTL eye is not in the same location to "also" use my PX TTL RP triggers)
Will also have there, the inexpensive strobist "Manual" Flash that is very popular ... the LumoPro LP120 (budget manual strobist flash $130), and the new LP160 ($160 , Manual flash , NOT TTL) which is touted as being as powerful as the top Nikon and Canon flashes (which I hear it is!), Four triggering options (great for strobist), has a metal Hot shoe mount (good new feature, yes I have broke one of my feet (Hot shoe mount) on the cheaper older LP120 (which MPEX will fix FREE for you fyi ... you just need to pay for shipping), a new digital optical slave that will ignore the TTL 'pre-flash' (cool, so you can now mix TTL flash with this manual flash, out-of-the-box), and as fast a recyle (hmmmm), at a fraction of the cost (but, did I mention there is no TTL or CLS) ... still, for strobist a great value. MPEX site for flashes is here: http://www.mpex.com/browse.cfm/2,736.html mpex flashes LINK
I love these Manual flashes because they are cheap and easy to use, and have all the strobist connections you need built in. (and there is less of a worry that someone will try to steal them lol).
Hope to see you at the workshop on July 25, 2010 ...
Have a feeling it will be FUN. :)
Ross Hamamura ... http://www.rdhphoto.net/
Sunday, May 23, 2010
Lighting & Portraiture Workshop by Tracy Wright Corvo
Yesterday, Saturday May 22, 2010 ... had a Great/Fun day assisting Tracy Wright Corvo with her " Lighting & Portraiture " Workshop, at Studio f22 at 3442 Waialae Avenue, * Lighting Gear sponsored by Hawaii Photo Rentals http://www.hawaiicamera.com/ (which there shop is pretty much downstairs) ...
LINK here to Tracy's blog about the workshop: http://tracywrightcorvo.blogspot.com/2010/04/lighting-portraiture-workshop-honolulu.html
FUN, because I did not have to put in all the hard advance work in that Tracy had to do ... in order to make this workshop as successful as it was, and I did not have to do "any" Post Processing work (the next day) ! That's an inside joke for Event/Wedding photogs :).
She "tricked" me though LOL. Told her I am NOT a good public speaker or teacher (this is not new to those that know me), and that I would love to asst. her with the Nikon Flash and Off camera Flash section of the workshop but I do not want to have to teach, or actually TALK (Tracy is a "very" good teacher and a great photographer, she also does a regular Children's photography class at UH http://www.outreach.hawaii.edu/pnm/Programs/HL2-PHOTO.asp ) . Anyway, she got me to work one of five sections she had set up (it's hard to say no, to someone as beautiful, talented, and nice ... as she is). It was to be a Nikon CLS section, but quickly turned into a Off camera Flash section, because more than half the students used Canon :)
Well, after the initial shock of not really knowing what to do ... I actually enjoyed it! Really. Obviously I love taking about Photography and Gear ... so, this was fun for me :) Now, I just need to learn how to incorporate more shooting for the students, and less talk about how I would shoot it. LOL
>>> * 5/31/2010 UPDATE: Tracy has told me (because of the success of this first workshop) there is already a second one planned ... Yes, I will bring my Manual JrX studio RadioPopper Triggers that "should" be able to work on any SLR camera with a Hot Shoe, and will trigger pretty much any Hot shoe Flash ... look for a date of July 25, 2010 SUN. The workshop will not be a Level two (next step) of the first workshop, but an improved version of the first, with more model shooting and a reveiw of shots taken, and how it applys to what was just learned.
OK, back to Tracy's MAY 2010 Workshop ....
For me, what I really loved about the workshop was that she included an actual shoot of Celia Kenny the Daughter of "Town Restaur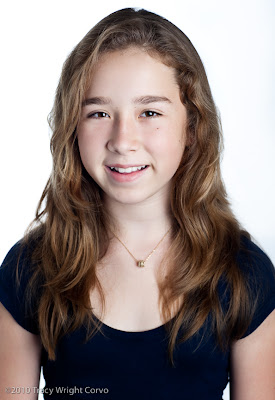 ant" owner , that is also a local actress.
Of course, there was a lot useful technical info being given ... but, this ... imho, was a demonstration of what makes Tracy great (and one of the reasons why I love her work) ... It is an essential element of portrait photography (imho) ... Moment, and Connection. In a few minutes in front of over 15 photography students (in a small studio) she was able to make the subject comfortable , Teach a class, AND talk to her subject enough to make her feel comfortable enough to reveal a small part of herself. Anyone that does this for a living knows this is not easy. (even more so, when you have a time limitation as well ... which is normal for this type of shooting)
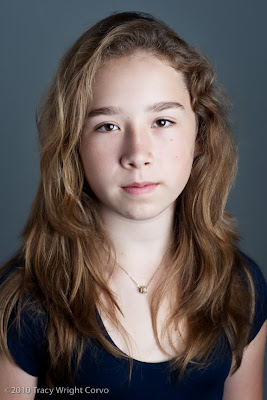
Note: both was shot with the same "white seamless" backdrop and settings ... only the distance from the background changed.
This was a learning experiance for me :) ... and hope I was able to share some information that will be useful.
For the Nikon shooters at the workshop ... promised I would post two things, and here it is:
1) "My" Nikon D700 camera settings (which I have posted before, fyi)
This is "evolving" but here you go:
* First: and most importantly I put ALL my favorite D700 camera "Menu" items on the ... "My menu" , menu (did I say that correct?) ...
this stops me from having to dig deep into the confusing list of menu items (so, now I have no clue where they are in the real menus lol)
* I LIST them in my must used order ... currently
* Second: and very important for me ... I tweak/customize some of the wheels and buttons to work better for "me". I will START with that, because it is the most used tweak on a shoot.
1) f9 reverse rotation = ON: so the comp wheels work in the right direction, * Change main/sub = ON ... both these changes helps me in my most used mode "A" Aperture priority ... allows me to change the Aperture with the BACK wheel ( I like changing the Aperture while my finger is on the shutter ) , and EV comp with a press of the EV button and BACK wheel. OR I can EV comp with the Front wheel (with no EV button press ... needs a b4 change)
* Menus and playback = ON
2) f2 Multi selector center Button : one of my most used feature ... * Shooting Mode = Reset to bring back my AF point to the Center quickly , * Playback Mode = Zoom so on a "automatic" Review on the LCD after each shot , I can quickly / easily Zoom in to 100 % aprox on the shot , this also keeps it in Review mode , and not shut off. (of course you need to Turn ON "Image Review" in the Playback Menu as well)
* another Big Trick in this menu is to set Playback mode>Zoom on/off>MEDIOUM MAGNIFICATION (which is about 100%) ... you can also in playback with this center button zoom trick , roll thru your shots at this zoom , cool when you want to compare two seq. shots.
3) f4 Photo info/playback ... Info at Up/Down , and Playback Left/Right ... in Photo Playback this allows me to quickly scroll thru my Fav Info OR go back and forth on my images.
4) Relates to above : in the Playback Menu ... "Display mode" ... I have Focus point, Highlights checked ... "my" most used playback modes. note: I can still scroll thru and see a histogram, but because the Histogram is generated from the imbeded JPG (in the RAW file) , and that I ONLY shoot RAW ... the Histogram is only slightly useable ... Highlight Blinkys more useful imho in the RAW digital age, where you can push to the Right.
5) Have the Focus mode selector switch to S (single shot) , and the top left dial to CL (set at 5fps) ... caution: whenever you take the D700/D3 out of your bag , check this Focus mode selector - You will thank me latter. This switch moves sometimes.
6) Metering Selector to "3D color Matrix II" ... fancy for Matrix ... and adjust all my comps with that in mind. The D700 Matrix Metering is very consistent and predictable ... and that is the most you can ask for. I will put myself down as Loving it, so I use it all (most ) of the time. Well, whenever I can. :)
7) AF area mode selector : Dynamic Area AF ... Very Fast AF/Accurate, and great in Low Light. I am super happy with the AF on the D700 and the new f2.8 lens.
8) d4 CL mode shooting speed 5fps (CL is my default setting) (CH is 8fps) ... If, you are the Focus and recompose type ... this will create problems for you, because after each shot in CL the D700 does re-focus , so your AF point needs to be above your subject.
9) e1 Flash sync speed 1/320s (Auto FP) ... so anything above 1/250 is auto HSS Flash
10) f1 switch : both , so on a right move of the light switch BOTH the back LCD and the top lights up , so I can do a quick check on the settings via a large 3" LCD
11) f11 No memory card = Lock ... no memory card , no shooting ... note: default is unlock (not a good thing)
12) f12 Reverse indicators to - 0 + ... logical for me
13) a1 AF-C priority selection : Release + Focus
14) b4 Easy exposure compensation = ON ... this let's me comp the EV in A using the front wheel (this in combo with my other settings)
15) in the Set Up Menu , LCD Brightness set to -2 ... this will give you a more True Brightness of your shot on the LCD ... listed this last , but is very important imho ... you might have to play with this for your own Monitor and PP (Post Processing) style.
Now, on to my Favorite "MY MENU" choices: (IF, you leave it on My Menu ... the Menu button quickly goes back to it. "My Menu" on the D700 has eliminated my need to ever go into the regular menus :)
1) e3 Flash ctrl for built-in Flash ... Which actually has the controls for Flash Commander Mode CLS , Love it, Use it. I am a strobist CLS kind of guy :)
2) ISO sensitivity settings ... auto ISO is a great feature , but you just have to be careful with it. I probably change this the most ... with my default at ... base iso200 top end iso6400 (being that on a D700 the "Unity Gain ISO" is iso6400 the hint is the dial setting, even though "in camera" it can go higher ... anything else can be pushed processed from a RAW file in Post, with the same results) ...
* and the shutter at what I can handhold "specific" for the Shoot/Lens. This is best when the conditions are changing fast. Shadow and Bright as you turn.
I also must note: "whenever" Lighting conditions are tricky ... say, almost anytime after the Sun actually sets ... I Turn Auto ISO OFF , and set the iso manually (most of the time, anywhy)
3) e2 Flash shutter speed ... my default is 1/30 but that changes.
4) a8 AF point selection ... when speed in selection is important I use 11 point
5) a3 Dynamic AF area ... 9 pr 21 depending on things around target
6) a5 AF activation .. I need this then I want to lock a AF in MF ... then I turn AF-ON only. Something I do often.
7) a9 Built-in AF assist illuminator ... so I can quickly turn off and ON
8) c3 Self-Timer delay ... let's me set the sec ... can use this instead of a remote shutter
9) Active D-Lighting ... allows me to turn Off an ON ... because it does affect how you expose in A mode , and therefore underexposes the RAW file (and can create a slightly more noisy file). (I shoot RAW) ... but, even in RAW D-Lighting ON shows you better (via the imbedded JPG) what can be done with the RAW file, and fyi LR v2.6 at default DNG LR import is very close to the D-Lighting JPG but less noisy imho.
10) Focus tracking with lock-on ... this is for AF-C shooting if you need to change
11) Long exp. NR
12) Multiple exposure
* I also have Shooting Menu and Custom setting BANK listed ... but, have not really used this much yet.
*** So, there it is ... IF, you have any improvements, to MY Nikon settings ... or something I left out , that would be important to use ... let me know.
2) a Digital Photography web site that has a wealth of Nikon information, as well as general Digital information for anyone ... trust me, it's worth a look no matter "what" camera system you use (Nikon info is on the earlier videos):
http://kelbytv.com/dtowntv/
Of course, if you have some great web sites you want to share ... please, feel free to email me. There already was many that was discussed at the workshop. So, we got a chance to all learn from each other.
Hope this helps someone,
Ross D. Hamamura ... www.RDHphoto.net
LINK here to Tracy's blog about the workshop: http://tracywrightcorvo.blogspot.com/2010/04/lighting-portraiture-workshop-honolulu.html
FUN, because I did not have to put in all the hard advance work in that Tracy had to do ... in order to make this workshop as successful as it was, and I did not have to do "any" Post Processing work (the next day) ! That's an inside joke for Event/Wedding photogs :).
She "tricked" me though LOL. Told her I am NOT a good public speaker or teacher (this is not new to those that know me), and that I would love to asst. her with the Nikon Flash and Off camera Flash section of the workshop but I do not want to have to teach, or actually TALK (Tracy is a "very" good teacher and a great photographer, she also does a regular Children's photography class at UH http://www.outreach.hawaii.edu/pnm/Programs/HL2-PHOTO.asp ) . Anyway, she got me to work one of five sections she had set up (it's hard to say no, to someone as beautiful, talented, and nice ... as she is). It was to be a Nikon CLS section, but quickly turned into a Off camera Flash section, because more than half the students used Canon :)
Well, after the initial shock of not really knowing what to do ... I actually enjoyed it! Really. Obviously I love taking about Photography and Gear ... so, this was fun for me :) Now, I just need to learn how to incorporate more shooting for the students, and less talk about how I would shoot it. LOL
>>> * 5/31/2010 UPDATE: Tracy has told me (because of the success of this first workshop) there is already a second one planned ... Yes, I will bring my Manual JrX studio RadioPopper Triggers that "should" be able to work on any SLR camera with a Hot Shoe, and will trigger pretty much any Hot shoe Flash ... look for a date of July 25, 2010 SUN. The workshop will not be a Level two (next step) of the first workshop, but an improved version of the first, with more model shooting and a reveiw of shots taken, and how it applys to what was just learned.
OK, back to Tracy's MAY 2010 Workshop ....
For me, what I really loved about the workshop was that she included an actual shoot of Celia Kenny the Daughter of "Town Restaur
 ant" owner , that is also a local actress.
Of course, there was a lot useful technical info being given ... but, this ... imho, was a demonstration of what makes Tracy great (and one of the reasons why I love her work) ... It is an essential element of portrait photography (imho) ... Moment, and Connection. In a few minutes in front of over 15 photography students (in a small studio) she was able to make the subject comfortable , Teach a class, AND talk to her subject enough to make her feel comfortable enough to reveal a small part of herself. Anyone that does this for a living knows this is not easy. (even more so, when you have a time limitation as well ... which is normal for this type of shooting)

Note: both was shot with the same "white seamless" backdrop and settings ... only the distance from the background changed.
This was a learning experiance for me :) ... and hope I was able to share some information that will be useful.
For the Nikon shooters at the workshop ... promised I would post two things, and here it is:
1) "My" Nikon D700 camera settings (which I have posted before, fyi)
This is "evolving" but here you go:
* First: and most importantly I put ALL my favorite D700 camera "Menu" items on the ... "My menu" , menu (did I say that correct?) ...
this stops me from having to dig deep into the confusing list of menu items (so, now I have no clue where they are in the real menus lol)
* I LIST them in my must used order ... currently
* Second: and very important for me ... I tweak/customize some of the wheels and buttons to work better for "me". I will START with that, because it is the most used tweak on a shoot.
1) f9 reverse rotation = ON: so the comp wheels work in the right direction, * Change main/sub = ON ... both these changes helps me in my most used mode "A" Aperture priority ... allows me to change the Aperture with the BACK wheel ( I like changing the Aperture while my finger is on the shutter ) , and EV comp with a press of the EV button and BACK wheel. OR I can EV comp with the Front wheel (with no EV button press ... needs a b4 change)
* Menus and playback = ON
2) f2 Multi selector center Button : one of my most used feature ... * Shooting Mode = Reset to bring back my AF point to the Center quickly , * Playback Mode = Zoom so on a "automatic" Review on the LCD after each shot , I can quickly / easily Zoom in to 100 % aprox on the shot , this also keeps it in Review mode , and not shut off. (of course you need to Turn ON "Image Review" in the Playback Menu as well)
* another Big Trick in this menu is to set Playback mode>Zoom on/off>MEDIOUM MAGNIFICATION (which is about 100%) ... you can also in playback with this center button zoom trick , roll thru your shots at this zoom , cool when you want to compare two seq. shots.
3) f4 Photo info/playback ... Info at Up/Down , and Playback Left/Right ... in Photo Playback this allows me to quickly scroll thru my Fav Info OR go back and forth on my images.
4) Relates to above : in the Playback Menu ... "Display mode" ... I have Focus point, Highlights checked ... "my" most used playback modes. note: I can still scroll thru and see a histogram, but because the Histogram is generated from the imbeded JPG (in the RAW file) , and that I ONLY shoot RAW ... the Histogram is only slightly useable ... Highlight Blinkys more useful imho in the RAW digital age, where you can push to the Right.
5) Have the Focus mode selector switch to S (single shot) , and the top left dial to CL (set at 5fps) ... caution: whenever you take the D700/D3 out of your bag , check this Focus mode selector - You will thank me latter. This switch moves sometimes.
6) Metering Selector to "3D color Matrix II" ... fancy for Matrix ... and adjust all my comps with that in mind. The D700 Matrix Metering is very consistent and predictable ... and that is the most you can ask for. I will put myself down as Loving it, so I use it all (most ) of the time. Well, whenever I can. :)
7) AF area mode selector : Dynamic Area AF ... Very Fast AF/Accurate, and great in Low Light. I am super happy with the AF on the D700 and the new f2.8 lens.
8) d4 CL mode shooting speed 5fps (CL is my default setting) (CH is 8fps) ... If, you are the Focus and recompose type ... this will create problems for you, because after each shot in CL the D700 does re-focus , so your AF point needs to be above your subject.
9) e1 Flash sync speed 1/320s (Auto FP) ... so anything above 1/250 is auto HSS Flash
10) f1 switch : both , so on a right move of the light switch BOTH the back LCD and the top lights up , so I can do a quick check on the settings via a large 3" LCD
11) f11 No memory card = Lock ... no memory card , no shooting ... note: default is unlock (not a good thing)
12) f12 Reverse indicators to - 0 + ... logical for me
13) a1 AF-C priority selection : Release + Focus
14) b4 Easy exposure compensation = ON ... this let's me comp the EV in A using the front wheel (this in combo with my other settings)
15) in the Set Up Menu , LCD Brightness set to -2 ... this will give you a more True Brightness of your shot on the LCD ... listed this last , but is very important imho ... you might have to play with this for your own Monitor and PP (Post Processing) style.
Now, on to my Favorite "MY MENU" choices: (IF, you leave it on My Menu ... the Menu button quickly goes back to it. "My Menu" on the D700 has eliminated my need to ever go into the regular menus :)
1) e3 Flash ctrl for built-in Flash ... Which actually has the controls for Flash Commander Mode CLS , Love it, Use it. I am a strobist CLS kind of guy :)
2) ISO sensitivity settings ... auto ISO is a great feature , but you just have to be careful with it. I probably change this the most ... with my default at ... base iso200 top end iso6400 (being that on a D700 the "Unity Gain ISO" is iso6400 the hint is the dial setting, even though "in camera" it can go higher ... anything else can be pushed processed from a RAW file in Post, with the same results) ...
* and the shutter at what I can handhold "specific" for the Shoot/Lens. This is best when the conditions are changing fast. Shadow and Bright as you turn.
I also must note: "whenever" Lighting conditions are tricky ... say, almost anytime after the Sun actually sets ... I Turn Auto ISO OFF , and set the iso manually (most of the time, anywhy)
3) e2 Flash shutter speed ... my default is 1/30 but that changes.
4) a8 AF point selection ... when speed in selection is important I use 11 point
5) a3 Dynamic AF area ... 9 pr 21 depending on things around target
6) a5 AF activation .. I need this then I want to lock a AF in MF ... then I turn AF-ON only. Something I do often.
7) a9 Built-in AF assist illuminator ... so I can quickly turn off and ON
8) c3 Self-Timer delay ... let's me set the sec ... can use this instead of a remote shutter
9) Active D-Lighting ... allows me to turn Off an ON ... because it does affect how you expose in A mode , and therefore underexposes the RAW file (and can create a slightly more noisy file). (I shoot RAW) ... but, even in RAW D-Lighting ON shows you better (via the imbedded JPG) what can be done with the RAW file, and fyi LR v2.6 at default DNG LR import is very close to the D-Lighting JPG but less noisy imho.
10) Focus tracking with lock-on ... this is for AF-C shooting if you need to change
11) Long exp. NR
12) Multiple exposure
* I also have Shooting Menu and Custom setting BANK listed ... but, have not really used this much yet.
*** So, there it is ... IF, you have any improvements, to MY Nikon settings ... or something I left out , that would be important to use ... let me know.
2) a Digital Photography web site that has a wealth of Nikon information, as well as general Digital information for anyone ... trust me, it's worth a look no matter "what" camera system you use (Nikon info is on the earlier videos):
http://kelbytv.com/dtowntv/
Of course, if you have some great web sites you want to share ... please, feel free to email me. There already was many that was discussed at the workshop. So, we got a chance to all learn from each other.
Hope this helps someone,
Ross D. Hamamura ... www.RDHphoto.net
Wednesday, April 21, 2010
Tethered D700 shooting with Lightroom v3 beta2 ... Hint: It's Great :)
Tethered D700 on Vista 64-bit, i7 quad core, tri-channel ram 6gb, two 7200rpm HDs, (and a Laptop dual core Vista) on a 20foot TripLite USB extension (think, this is one of the best USB extensions), plus the 5 feet of Nikon USB cable (total 25 feet of USB) works "really" well on a test, low volume shooting. Well enough to test it on a paid job.
* Talking impressive speed to my desktop (laptop is ok) on a 8fps burst, popping up on the screen .. EVEN applying my pre-sets, that are applied "by" ISO/Camera on import. Wow!
* will test it on a paid job within a week. (yes, I know it's a beta lol ... but, you know ... the only real test, is a large test, on something real ... because it's always on a job that $hit happens lol)
My only fear is that it is NOT saving a copy to the CF.
On a Nikon D700 + LRv3 beta2 it only goes to the HD (right now) ... but, the speed , even across 25 feet of USB was Fast "enough" and reliable. Did I say, going to my desktop the speed was FAST :). even on the Start up recognizing my D700.
* Color me IMPRESSED !
imho, it works pretty solid and fast on a D700 ... Adobe "really" made this Tether LINK to the D700 "PRO use" imho. as far as what you really need , speed and reliability (for a beta)
ZERO hiccups so far ... a real test would be a 1000 shot job tethered.
Oh, here's a "kinda" cool thing ... as you shoot Tethered ... and using your file re-naming as you shoot ... IF, you turn off Tether ... shoot Un-Tethered to the CF ... Then, go back to Tether shooting ... LR v3 remembers the file name you "left off" at in the menu at start up, and gives you the next number as a start value.
>>> * 5/1/2010 update: did a 500 shot paid gig with the D700 tethered using LR v3 b2 ... and it was SOLID , not a single issue. Fast enough to a dual core Laptop Vista 64-bit. 7,200 rpm HD 6gb ram. ... imho, this is a PRO set up. Adobe must have known that , and planned for it. <<<
* I would like to see the "exact" same choices on the import of a Tether shot ... as on a imported RAW shot from a CF. That would mean auto Folder creation by date inside your chosen HD folder.
* Would also like to see ability to trigger a long exposure ... is it there already ?
and multiple exposures. ( even a pre-set HDR setting )
I am "really" getting excited about this v3 beta2
*** Discovered a interesting BUG when using one of my D700 that has an SanDisk Extreme PRO 16gb CF in it.
Lightroom v3 beta will NOT Tether or Import data from it, with a USB link. (I always use a Reader to Import/download to LR)
In Vista 64-bit I can open up Explorer and transfer files from my D700 via USB to my HD ... AND I can Import direct from the PRO 16gb CF to LR v3 from a Reader.
Very strange ...
4/22/10 update:
Work around for SanDisk Extreme PRO 16gb and Tether
•Just take the CF out, AND make sure
f11 No Memory Card? is set to : OK Enable release
fyi: normally I have this set to LOCK ... because I don't want the D700 to shoot if I Don't have a CF card in it ... normally
* personally, I don't like changing this f11 setting ... so, when I tether ... now ... I "just" swap out my SanDisk Extreme PRO 16gb CF for a Sandisk Extreme IV 8gb CF and it works fine.
This is looking like it's a D700 read issue with the Extreme PRO 16gb CF card.
LR will not import direct from the D700 via USB with the CF either.
but, can do it from a Reader.
*** 8/12/2010 UPDATE ... I just checked to see if my Extreme PRO 16gb CF card would work while Tethering ... and in the shipping copy of Lightroom v3 IT DID !
So, I guess it was a LR v3 beta issue (or at least Adobe found a work around) ... becaue it is working with the CF card that it would not before.
Have not tested this yet ... but, my guess is that it will probably Import via USB off the CF too now.
YES, I am in LOVE "again" with my FAST, FAST, Smoking FAST SanDisk Extreme PRO CF cards.
Now, on to the ExpressCard Reader ... even though the SanDisk version might have a short guide on the CF slot.
That's my take ... so far
Ross
* Talking impressive speed to my desktop (laptop is ok) on a 8fps burst, popping up on the screen .. EVEN applying my pre-sets, that are applied "by" ISO/Camera on import. Wow!
* will test it on a paid job within a week. (yes, I know it's a beta lol ... but, you know ... the only real test, is a large test, on something real ... because it's always on a job that $hit happens lol)
My only fear is that it is NOT saving a copy to the CF.
On a Nikon D700 + LRv3 beta2 it only goes to the HD (right now) ... but, the speed , even across 25 feet of USB was Fast "enough" and reliable. Did I say, going to my desktop the speed was FAST :). even on the Start up recognizing my D700.
* Color me IMPRESSED !
imho, it works pretty solid and fast on a D700 ... Adobe "really" made this Tether LINK to the D700 "PRO use" imho. as far as what you really need , speed and reliability (for a beta)
ZERO hiccups so far ... a real test would be a 1000 shot job tethered.
Oh, here's a "kinda" cool thing ... as you shoot Tethered ... and using your file re-naming as you shoot ... IF, you turn off Tether ... shoot Un-Tethered to the CF ... Then, go back to Tether shooting ... LR v3 remembers the file name you "left off" at in the menu at start up, and gives you the next number as a start value.
>>> * 5/1/2010 update: did a 500 shot paid gig with the D700 tethered using LR v3 b2 ... and it was SOLID , not a single issue. Fast enough to a dual core Laptop Vista 64-bit. 7,200 rpm HD 6gb ram. ... imho, this is a PRO set up. Adobe must have known that , and planned for it. <<<
* I would like to see the "exact" same choices on the import of a Tether shot ... as on a imported RAW shot from a CF. That would mean auto Folder creation by date inside your chosen HD folder.
* Would also like to see ability to trigger a long exposure ... is it there already ?
and multiple exposures. ( even a pre-set HDR setting )
I am "really" getting excited about this v3 beta2
*** Discovered a interesting BUG when using one of my D700 that has an SanDisk Extreme PRO 16gb CF in it.
Lightroom v3 beta will NOT Tether or Import data from it, with a USB link. (I always use a Reader to Import/download to LR)
In Vista 64-bit I can open up Explorer and transfer files from my D700 via USB to my HD ... AND I can Import direct from the PRO 16gb CF to LR v3 from a Reader.
Very strange ...
4/22/10 update:
Work around for SanDisk Extreme PRO 16gb and Tether
•Just take the CF out, AND make sure
f11 No Memory Card? is set to : OK Enable release
fyi: normally I have this set to LOCK ... because I don't want the D700 to shoot if I Don't have a CF card in it ... normally
* personally, I don't like changing this f11 setting ... so, when I tether ... now ... I "just" swap out my SanDisk Extreme PRO 16gb CF for a Sandisk Extreme IV 8gb CF and it works fine.
This is looking like it's a D700 read issue with the Extreme PRO 16gb CF card.
LR will not import direct from the D700 via USB with the CF either.
but, can do it from a Reader.
*** 8/12/2010 UPDATE ... I just checked to see if my Extreme PRO 16gb CF card would work while Tethering ... and in the shipping copy of Lightroom v3 IT DID !
So, I guess it was a LR v3 beta issue (or at least Adobe found a work around) ... becaue it is working with the CF card that it would not before.
Have not tested this yet ... but, my guess is that it will probably Import via USB off the CF too now.
YES, I am in LOVE "again" with my FAST, FAST, Smoking FAST SanDisk Extreme PRO CF cards.
Now, on to the ExpressCard Reader ... even though the SanDisk version might have a short guide on the CF slot.
That's my take ... so far
Ross
Wednesday, March 24, 2010
Contemporary Photography in Hawaii Exhibit April 2 - 30, 2010
Contemporary Photography in Hawaii Exhibit April 2 - 30, 2010
* 5/1/2010 Update: est. over 350 visitors at the opening!
It was crowded. This was not a large location.
I had fun, and probably had a little too much wine that night :) *
The Second Annual Statewide Survey Exhibition
Sponsored by UHM Pacific New Media
At Frame Arts Hawaii Downtown ... 627 South St. Hawaii
Opening Reception will be April 2, 2010 6pm to 9pm
Hope to see you there.
Please Support Juried Exhibits like this for Hawaii Photographers
(open to all, even PROs)
It's a Annual Exhibit.
Below is the Invite:
Was nice that they used a crop of my print on the flyer ... it's the infinity pool (with model Taylor) image on the top/right :)

* 5/1/2010 Update: est. over 350 visitors at the opening!
It was crowded. This was not a large location.
I had fun, and probably had a little too much wine that night :) *
The Second Annual Statewide Survey Exhibition
Sponsored by UHM Pacific New Media
At Frame Arts Hawaii Downtown ... 627 South St. Hawaii
Opening Reception will be April 2, 2010 6pm to 9pm
Hope to see you there.
Please Support Juried Exhibits like this for Hawaii Photographers
(open to all, even PROs)
It's a Annual Exhibit.
Below is the Invite:
Was nice that they used a crop of my print on the flyer ... it's the infinity pool (with model Taylor) image on the top/right :)
Wednesday, March 10, 2010
D700 my fav LCD configs
Thought after buying the GGS LCD Screen protector :) you might want me to re-blog separately about my D700/D3 LCD config's. lol
 Here's what I love to do, with the below config's ... because I have configured auto playback after each shot.
When I take a shot and don't need to look at the LCD or I don't want the LCD to light up, just tap the shutter button ... this will bring you back into shooting mode and blank the LCD screen.
IF, there is a shot I want to look at closer, and not be limited to the quick after-shot review "time-out" I configured in c4 ... I will press the Center Button (on the Multi-selector) to zoom in on the reviewed shot.
another Center button press takes me to full screen.
A Up arrow or Down arrow scrolls me thru ... Blinkys, Histogram, AF point.
Now if I took two-three shots consecutively seq. ... I zoom in on the first shot and then the Back Wheel to compaire the two zoomed in shots at the same spot (eyes).
* My Config's:
1) In the Set Up Menu , LCD Brightness set to -2 ... this will give you a more True Brightness of your shot on the LCD ... You "might" have to tweak this to what you see on your computer monitor, and if this setting gives you enough visual clues to adjust exposure via your LCD ...
* now during bright daylight you might need a Hoodman 3" , which imho is "Highly Recommended" for shot review! How did I go on all these years without a Hoodman during the day?
2) f4 Photo info/playback ... Info at Up/Down , and Playback Left/Right ... in Photo Playback this allows me to quickly scroll thru my Fav Info OR go back and forth on my images.
3) Relates to above : in the Playback Menu ... "Display mode" ... I have Focus point, Highlights checked ... I default to Highlights blinkys
4) f1 switch : both , so on a clock-wise move of the light (on/off) switch BOTH the back LCD and the top lights up , so I can do a quick check on the settings via a large 3" LCD
5) f9 * Menus and playback = ON
6) f2 Multi selector center Button : one of my most used feature ... * Shooting Mode = Reset to bring back my AF point to the Center quickly , * Playback Mode = Zoom so on a "automatic" Review on the LCD after each shot , I can quickly / easily Zoom in to 100 % aprox on the shot , this also keeps it in Review mode , and not shut off.
* another Big Trick is to set Playback mode>Zoom on/off>MEDIUM MAGNIFICATION (which is about 100%)
7) Turn ON "Image Review" in the Playback Menu
8) c4 Monitor Off Delay ... You can shorten the time if the LCD light up is too long
Hope this Helps someone,
Ross Hamamura
Monday, March 8, 2010
GGS LCD Screen Protector made of Optical Glass for D700
GGS LCD Screen Protector made of Optical Glass for D700, (but, not only for Nikon, they have this for Canon cameras too)
Review by Ross Hamamura
First let me just say that I was never impressed with the original “Plastic” LCD protector on what I feel has been the BEST LCD (3 inch and 920k), and has been the high end standard since the Nikon D3 (Aug 2007, wow has it been that long?) and is also the same 3 inch LCD on my D700.

My Thoughts about the GGS LCD Optical Glass protector for the D700:
* Love the fact that it’s made from Optical Glass … imho, it’s Better in soooo many ways vs the original Nikon plastic protector.
Have “never” used a LCD protector before , but, this one I would buy again and use on even Future Camera’s.
* It does seem durable, and the multi Layer idea seems to be a good one.
* Have had prior experience with 3M glue tape, and it’s Great! (used it to attach plexi signs to store display racks, some are still going after 20 years) So, the fact that they are using 3M glue tape on this is great. The 3M glue back , also allows you to make a small (very small) adjustment to the Fit … but, will hold solid.
* The FIT for the D700 is perfect. The pieces are made exactly for the D700 imho.
* Was amazed at how “Easy” it was to put the GGS on the D700. … and that there was NO Air Bubbles to take out. (and I had to put on four pieces)
My advice on installation:
1) Clean off (with Micro fiber) and blow with air, the LCD
2) Practice, what you are going to do, before you peel off the back glue side … remember this is VERY sticky 3M Glue tape.
3) I lined up the Top edge and just flipped it down
4) After the GGS was on the LCD, I moved it slightly into a perfect Fit over the original LCD … note: you are not going to be able to make big moves , so it’s best to do it right the first time. (or close to it)
5) Imho, it would NOT be a good idea to take it off and try to do it again. (regardless of that the box says) Because the glue is strong and you could crack the thin glass layers. (I think once the GGS is attached, the layers might actually help in the durability.
Conclusion:
This is a great product that is amazingly easy to install, at a great price. Shipped quickly and cheaply. (even to Hawaii).
My best endorsement for this is … I have never used a LCD protector before, BUT, after this GGS LCD Optical Glass Protector , I would buy this for ANY and ALL camera LCD’s I have in the Future.
Love it when a product “Just Works” … as advertised … and does it cheaply.
Hope this helps someone,
Ross Hamamura
Review by Ross Hamamura
First let me just say that I was never impressed with the original “Plastic” LCD protector on what I feel has been the BEST LCD (3 inch and 920k), and has been the high end standard since the Nikon D3 (Aug 2007, wow has it been that long?) and is also the same 3 inch LCD on my D700.

“This” GGS LCD Screen Protector is highly touted (owned by many Nikon owners) on the web/forums and is made of Optical Glass (NOT Plastic) ... Love it when other's share a great product with me, and is why I am sharing this with you (passing it on... ) …
So, it was a no brainer for me to order two(2) sets… and it was Cheap! And fyi, it arrived very Fast , within days.
Only $8.75 each when you buy two via eBay (that includes shipping to Hawaii) My total for two(2) sets (each set has a Top and Main LCD protector) … including shipping it was $ 17.50 ...
I bought it from a Top-Rated eBay Seller ... BHS-Photo , who has a Well Deserved 100 % positive feedback .. They shipped this item FAST. and only took a few days to get to Hawaii.
LINK:
http://myworld.ebay.com/bhs-photo/
* This information is directly from the GGS LCD Screen Protector Package:
"GGS professional LCD screen protector is characterized by high transparency, anti-scrape, anti-bump, anti-aging and easy installation. It completely breaks through the design concept of the previous products by using raw material of ultra thin optical glass and special processing. It is more integrated with six layers protection as well.
1. It uses a 0.5mm ultra thin optical glass with at least 90% transmittance. With high transparency, the image is displayed in focus when applied.
2. Its hardness and durability is as high as mohs scale 8H and its elasticity and flexibility is 4kg/m, preventing from being rubbed, scraped and bumped.
3. It will not damage the LCD screen at all with the anti-crack layer and its anti-bump degree has reached 8kg/cm.
4. It is well sealed by 3M double side adhesive tape which is not easy to be unglued. It is easy to be Installed without being cut. There is no air bubble or angle occurs when applied. It is not affected by temperature or humidity.
5. It prevents the LCD screen to be infracted by sweat stain, smear, acid and alkali elements and prolongs the life of the screen.
6. It can be removed and be reused if the glutinosity hasn’t been damaged.”
Six Layers:
1) Protective Layer
2) Transparent Layer
3) Color Layer
4) Anti-Crack Layer
5) Protective layer
6) Adhesive Layer
My Thoughts about the GGS LCD Optical Glass protector for the D700:
* Love the fact that it’s made from Optical Glass … imho, it’s Better in soooo many ways vs the original Nikon plastic protector.
Have “never” used a LCD protector before , but, this one I would buy again and use on even Future Camera’s.
* It does seem durable, and the multi Layer idea seems to be a good one.
* Have had prior experience with 3M glue tape, and it’s Great! (used it to attach plexi signs to store display racks, some are still going after 20 years) So, the fact that they are using 3M glue tape on this is great. The 3M glue back , also allows you to make a small (very small) adjustment to the Fit … but, will hold solid.
* The FIT for the D700 is perfect. The pieces are made exactly for the D700 imho.
* Was amazed at how “Easy” it was to put the GGS on the D700. … and that there was NO Air Bubbles to take out. (and I had to put on four pieces)
My advice on installation:
1) Clean off (with Micro fiber) and blow with air, the LCD
2) Practice, what you are going to do, before you peel off the back glue side … remember this is VERY sticky 3M Glue tape.
3) I lined up the Top edge and just flipped it down
4) After the GGS was on the LCD, I moved it slightly into a perfect Fit over the original LCD … note: you are not going to be able to make big moves , so it’s best to do it right the first time. (or close to it)
5) Imho, it would NOT be a good idea to take it off and try to do it again. (regardless of that the box says) Because the glue is strong and you could crack the thin glass layers. (I think once the GGS is attached, the layers might actually help in the durability.
Conclusion:
This is a great product that is amazingly easy to install, at a great price. Shipped quickly and cheaply. (even to Hawaii).
My best endorsement for this is … I have never used a LCD protector before, BUT, after this GGS LCD Optical Glass Protector , I would buy this for ANY and ALL camera LCD’s I have in the Future.
Love it when a product “Just Works” … as advertised … and does it cheaply.
Hope this helps someone,
Ross Hamamura
Tuesday, February 23, 2010
RadioPopper JrX Cubes
2/23/2010 For those RadioPopper Fans out there (showed the JrX and PX system, in the Jan EOH lighting meeting in Hawaii) ...
* Tyson Yamada (a fellow EOH D700 / RP user) showed me some "cubes" for the RP JrX system (at this last Feb EOH meeting) that allows you to "Control" the power of your remote TTL Flashes (not in TTL but Manual mode) ... note: RP has been promising shipping on the "RP cube" for months , and versions of it has been shipping from freelancers and DIY.
What is Very Cool about it is that the "cubes", plus the JrX Trigger and "studio ver" REC will allow you to control remotely your Off-Camera TTL Flashes. So, no more walking to adjust the power! :) This is the LINK Tyson gave me ... fyi: he has them, and told me they are very solid/reliable ...
p.s. these are not the RP cubes that RadioPoppers have delayed shipping on .... but, they are Here and Now , and they work. FM version $ 25.00 + shipping ... note: they don't work with the sb900 because it does not have the old TTL quench circuit built-in (p.s. the ONLY thing I don't like about this new Nikon flash ... but, I do Love the sb900 ... but, that's another blog lol ... but , here's a teaser tip ... what "might" help Overheating (if you have that issue with the D700 sb900, I don't) make sure your Hot Shoe is solid and there is no movement in the contact to the sb900 ... and use DeToxIt , here the PEN version is best to clean the contacts (controled application), mainly on the flash Hot Shoe, when the current has to jump the gap ... LINK: http://store.caig.com/s.nl/sc.2/category.188/.f )
Cube LINK:
http://www.fredmiranda.com/forum/topic/854383/0?keyword=Cube
p.s. another Cool thing , I think he is also selling is a PC connect cord that uses the Nikon screw LOCK ... which for those that "know" ... know that non-screw lock cords FALL OFF and are not reliable, because they go loose on you.
* on that subject ... this is a LINK to a company that does Custom cords .. at any length ... and has that locking #11 screw tip for Nikon
http://www.paramountcords.com/nikon1.asp
UPDATE 6/2010 ... FOUND A CHEAP NIKON SCREW SYNC CORD THAT REALLY WORKS ... one even for trigger of the D700/D3 remote using your Radio Poppers JrX.
http://tourist-of-light.blogspot.com/2010/06/nikon-screw-type-sync-cords-to-35mm.html
Just in case you don't know what RadioPopper JrX studio ver. are ... They are one of the Hottest Radio Triggers around now. Think Pocket Wizards ( Just as reliable, with Huge distance) at less than half the price.
1) But, here's the Twist ... The studio version , right out of the box can control "most" studio strobes (AB and WL come to mind) ... we are talking both power and model lamp, remotely.
2) and then this is it's party trick ... It can ALSO control TTL flashes that use the standard "old" TTL quench circuit (the new Nikon sb900 is one of the rare exceptions) ... control of power level is manual, via three knobs for three groups. * I "really" HOPE RP has a work around for the sb900 *
3) Oh, there's more ... ADD the more expensive PX Transmitter as your trigger (instead of the JrX trigger) ... and you can have most strobes (AB and WL are tested brands) fire in HSS ... so, you can fire at Flash sync speeds at higher than 1/250 (or whatever your camera flash sync is) ... body needs to support HSS. and right now the RP PX TTL systems only works on Nikon and Canon. (fyi: for those that have been following my Journey, this is another reason why I had to make a move to Nikon, manf. support for lighting gear)
* Confused about the Difference between the RadioPopper PX and JrX "studio" version , besides the almost $200 difference in price each unit? (fyi: DO NOT buy the basic version, you will thank me latter)
Well the JrX is like an enhanced and cheaper version of the traditional /standard Radio Trigger Pocket Wizard. The PX is the First TTL Radio trigger , and fyi: It Really, Really works ... I own them both and they are SOLID/RELIABLE, Period. We are talking "beyond" a football field length reliable (I tested on St. Louis football field), and behind walls reliable. :)
Link to RadioPoppers site: http://radiopopper.com/
9/7/11 Update * Here's a old LINK to a Strobist that also uses RadioPopper JrX studio, and probably bought them on the First shipment as I did ... I agree, with what he says.
and after more than a year of use ... they are 100% reliable , "really" :)
It cannot be overstated how Solid this product is. There is ZERO Pocket Wizzard envy.
http://www.flickr.com/groups/strobist/discuss/72157622075418399/
Hope this helps someone ... and adds to the information,
Ross
* Tyson Yamada (a fellow EOH D700 / RP user) showed me some "cubes" for the RP JrX system (at this last Feb EOH meeting) that allows you to "Control" the power of your remote TTL Flashes (not in TTL but Manual mode) ... note: RP has been promising shipping on the "RP cube" for months , and versions of it has been shipping from freelancers and DIY.
What is Very Cool about it is that the "cubes", plus the JrX Trigger and "studio ver" REC will allow you to control remotely your Off-Camera TTL Flashes. So, no more walking to adjust the power! :) This is the LINK Tyson gave me ... fyi: he has them, and told me they are very solid/reliable ...
p.s. these are not the RP cubes that RadioPoppers have delayed shipping on .... but, they are Here and Now , and they work. FM version $ 25.00 + shipping ... note: they don't work with the sb900 because it does not have the old TTL quench circuit built-in (p.s. the ONLY thing I don't like about this new Nikon flash ... but, I do Love the sb900 ... but, that's another blog lol ... but , here's a teaser tip ... what "might" help Overheating (if you have that issue with the D700 sb900, I don't) make sure your Hot Shoe is solid and there is no movement in the contact to the sb900 ... and use DeToxIt , here the PEN version is best to clean the contacts (controled application), mainly on the flash Hot Shoe, when the current has to jump the gap ... LINK: http://store.caig.com/s.nl/sc.2/category.188/.f )
Cube LINK:
http://www.fredmiranda.com/forum/topic/854383/0?keyword=Cube
p.s. another Cool thing , I think he is also selling is a PC connect cord that uses the Nikon screw LOCK ... which for those that "know" ... know that non-screw lock cords FALL OFF and are not reliable, because they go loose on you.
* on that subject ... this is a LINK to a company that does Custom cords .. at any length ... and has that locking #11 screw tip for Nikon
http://www.paramountcords.com/nikon1.asp
UPDATE 6/2010 ... FOUND A CHEAP NIKON SCREW SYNC CORD THAT REALLY WORKS ... one even for trigger of the D700/D3 remote using your Radio Poppers JrX.
http://tourist-of-light.blogspot.com/2010/06/nikon-screw-type-sync-cords-to-35mm.html
Just in case you don't know what RadioPopper JrX studio ver. are ... They are one of the Hottest Radio Triggers around now. Think Pocket Wizards ( Just as reliable, with Huge distance) at less than half the price.
1) But, here's the Twist ... The studio version , right out of the box can control "most" studio strobes (AB and WL come to mind) ... we are talking both power and model lamp, remotely.
2) and then this is it's party trick ... It can ALSO control TTL flashes that use the standard "old" TTL quench circuit (the new Nikon sb900 is one of the rare exceptions) ... control of power level is manual, via three knobs for three groups. * I "really" HOPE RP has a work around for the sb900 *
3) Oh, there's more ... ADD the more expensive PX Transmitter as your trigger (instead of the JrX trigger) ... and you can have most strobes (AB and WL are tested brands) fire in HSS ... so, you can fire at Flash sync speeds at higher than 1/250 (or whatever your camera flash sync is) ... body needs to support HSS. and right now the RP PX TTL systems only works on Nikon and Canon. (fyi: for those that have been following my Journey, this is another reason why I had to make a move to Nikon, manf. support for lighting gear)
* Confused about the Difference between the RadioPopper PX and JrX "studio" version , besides the almost $200 difference in price each unit? (fyi: DO NOT buy the basic version, you will thank me latter)
Well the JrX is like an enhanced and cheaper version of the traditional /standard Radio Trigger Pocket Wizard. The PX is the First TTL Radio trigger , and fyi: It Really, Really works ... I own them both and they are SOLID/RELIABLE, Period. We are talking "beyond" a football field length reliable (I tested on St. Louis football field), and behind walls reliable. :)
Link to RadioPoppers site: http://radiopopper.com/
9/7/11 Update * Here's a old LINK to a Strobist that also uses RadioPopper JrX studio, and probably bought them on the First shipment as I did ... I agree, with what he says.
and after more than a year of use ... they are 100% reliable , "really" :)
It cannot be overstated how Solid this product is. There is ZERO Pocket Wizzard envy.
http://www.flickr.com/groups/strobist/discuss/72157622075418399/
Hope this helps someone ... and adds to the information,
Ross
Subscribe to:
Posts (Atom)
