Sunday, February 13, 2011

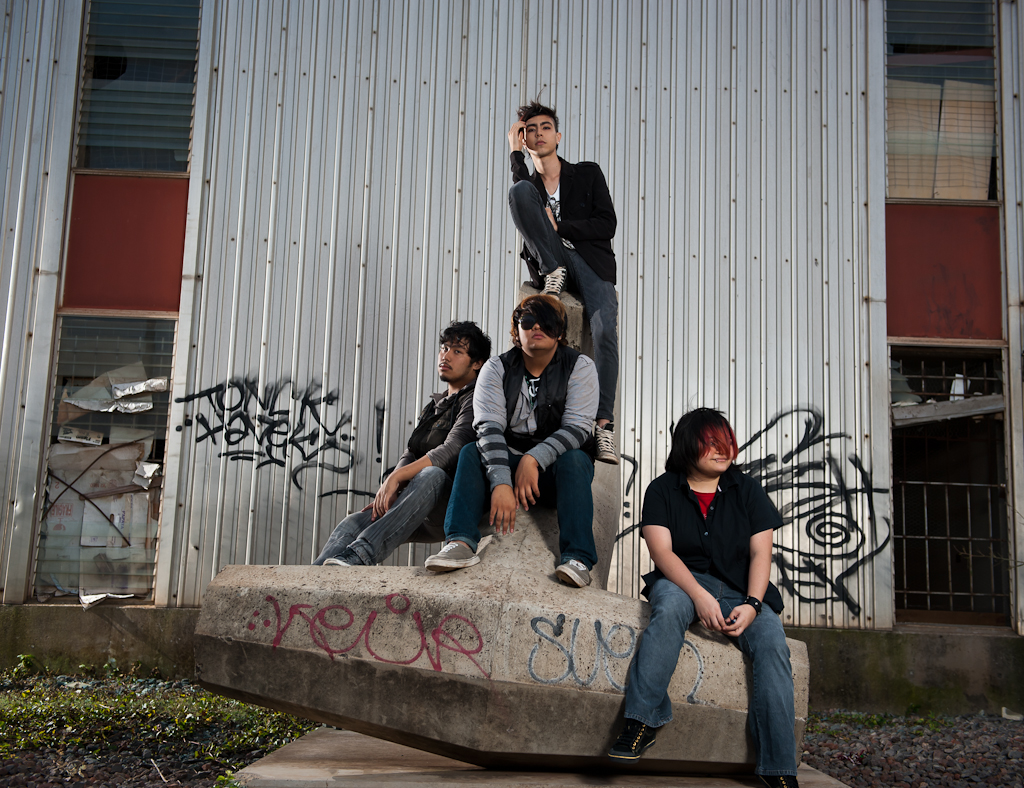
WSSM 2011 Senior Frogs Party, A Different Valentines Day :)

For some strange reason it was a long shooting day yesterday, Valentines Day. (or should I say, Valentines day "Party" day)

Shooting a young band at three locations ... and on the way to the third location ... they (the Band) gets busted for a Safety Check violation. lol
Isn't it a little "cliche"  when a band drives around in a  "piece of $hit" car?
So, we arrive at the last location that "had" nice light at sunset.  I really wanted to shoot this natural light (the sun had dropped and the street lights was already on).

Well,  what is interesting about my last shot was ... I did it at iso6400 , handheld at 1/30, 80mm, f2.8  ... I had lighting (my portable strobist stuff), so I did not have to shoot Natural light/high ISO.  But, I had made up my mind I was going to do this all ambiant ... and here it is.
Only in LR , shot RAW  ... NO  Noise reduction at all  ... so any grain in the shot, is what is there on the D700 at iso6400.
What was nice is ... I probably would have "added" grain , after the shot  ... but instead ,  I did it with iso6400, no NR at all.

Here is the shot:


Here's the bust:
Note:  notice the officer "Texting"  while his partner is  checking the reg and papers :) ... "Seriously?", really?.     Wonder if he was checking out the bands Facebook page?    maybe he was Friend-ing them. :)


Here's a shot from that location  lol:
talking right at the spot of the bust ...


After this shoot.  It was on to a Party by WSSM (Women's Surf Style Magazine)  at Senor Frogs in Waikiki.
"Valentines Day" themed Party.
It's a tough job ... but, someone had to do it.  lol

* Now, imagine  the RAP song "Black and Yellow"  blasting from the speakers ... standing room only ... and then you got the feeling. :)


It was a long day ... and that party was going past 2am  ... but  FUN.
Like I said before,   It's a tough job,  and someone had to do it  :)

Ross Hamamura
The Tourist of Light
http://www.rdhphoto.net/

Friday, February 11, 2011

How to program a Button to do Handheld HDR, on a Nikon D700/D3

Nikon D700/D3, How to program a Button to do Handheld HDR

I am not sure why it was so hard to find some instructions on how to do this.
fyi I even emailed Nikon, and on there Service site they told me it could not be done (they probably did not understand what I wanted to do)


* FIRST,  I need to say ... basically all you are doing is assigning  BKT to the FUNC button.

Here is a short List of Menu changes to make it simple:


* b2) 1 step
* e6) Flash/speed
* e7)  MTR-Under-Over
* f6) Preview button press: BKT
   f6) Preview + command dials: BKT
*Set release to Ch
* Press INFO/Preview button and turn dial to 5F
* Set exposure in A mode  , I also like to set the ISO
* Focus
* Hold Release button down until it stops firing.

* If more than five shots are required, press the FUNC button to change 5 to 9.


NOW the LONG verson:
imho,  programs like  PS CS5 combined with LR v3.3 is making it easier to create HDR images.

So, now what you need is your camera (in my case a Nikon D700) to be able to fire off  at least three exposures ... EV0, EV-2, EV+2  ,  a Normal exposure, a 2 stop under , and a 2 stop over file.
and to do it as Quickly and easily as possible.  To eliminate as much movement while doing the shot.

The idea of doing it Handheld is to press one button and have it fire off the shots as quickly as possible.

Here's how it is done:

1)  what I like to do is make sure to set the ISO value ... and make sure at "that ISO value" the -2 EV shot is not tooo slow of a shutter and is something I can handhold. 

* I normally will use Aperture Priority and have the  "Shutter value"  change on the bracket.

So, selecting a ISO value is finding that balance of  Noise and Shutter handhold ability.

2)  Depending on how much time I have to set up the shot ...  might  lock my  AF so the AF point does not change.   but, most of the time I do not.  imho, it's easy enough to make sure my AF point is over a subject that is big enough and will not move. :)

OK,  now on setting up the D700/D3

3)  Set ... Menu - e5  Auto Bracketing set - AE only
Basically set up to bracket exposure

4)  Now to assign the Bracketing to the FUNC button ... on the D700 it would be the bottom button up front on the right.
Set .... Menu - f5   Assign FUNC. button - set "both" LINES * top FUNC. button press to BKT Bracketing burst  .... and the * bottom  FUNC. button + dials to BKT Auto bracketing

5)  I "also" like to set f1 change  to Both  ... with allows me to turn the shutter switch to the right to both turn on the LCD light and to show INFO on the LCD.
OR you can simply look at the top LCD.

6)  So, if you  look at the Top LCD , AND then press the   FUNC button .. you can roll the Back wheel to set How many Frames you will shoot on a Bracket (set to 5),  and use the Front wheel to set the  EV value (set to 1) , unfortunately Nikon only lets you  bracket at 1 stop increments.
To end up with at least one file at EV-2 and one file EV+2  ... you actually need 5 shots at 1 EV increments.

So, set the Bracket at 5 frames at 1 EV increments ... this will give you  "EV0" , EV-1 , "EV-2" , EV+1 , "EV+2"  ...   but, imho you need only the three files  EV0, EV-2, EV+2  (I delete the other two)

7)  this last step is not necessary ,  BUT if you "don't"  want to have to count off  5 shots , and have the camera STOP after 5 shots for you ... change the top/left dial to "S"  Single shot.

Even at this "S" Single Shot setting , the Nikon D700 will fire off 5 frames at the Highest Rate possible ... when you hold down the shutter.

side note:
Someone discovered that if you set the e5 Auto bracketing set to "flash only" , and then have the PopUP flash DOWN, you will fire them "even" faster , which is aprox.  6 frames per second , without a grip.  Yes, this is faster than the 5fps that the D700 is supposed to do "without" a grip.  Nice!   a FW bug that works in your favor.

NOW  ... if you followed me so far ...  :)

ALL you need to do now  ... when you are walking around  ... and want to fire off 5 frames Bracketed:

* Half press to lock your AF , press & hold the FUNC button  , then full shutter =  The D700 will then fire off 5 frames at full speed and stop , Bracketed.

Now how coool is that !


p.s. After you are DONE shooting HDR,  Don't forget to change back ... FUNC button 5 f (5 frames) to 0 ( zero frames )  on  BKT.
Press the FUNC button and Back Wheel  roll to 0.

....................................................................................
What if you want to  HDR bracket properly on a Tripod.
Well,  you can add these functions ...  (I ADD it to the MY Menu so I can find it fast).

* d9  Exposure Delay mode  ...  which delays the shutter until 1 second after the mirror is raised.
(just remember to turn this OFF after your HDR shot on a tripod)
* Interval timer shooting  ... found on the shooting menu  ...   You can set this a 1 sec  ..  and 1x5 shots ( 1 set , 5 shots )  ...  so, it will basically fire after you take your hand off it.


Hope this helps someone,
Ross Hamamura    http://www.rdhphoto.net/
The Tourist of Light

Saturday, January 8, 2011

Updated version of the Black Rapid DR-1 Double Strap

I owned an older Black Rapid DR-1 Double Strap (before it was stolen) had been using it for over a year.

"HAD" to order another one, period.

It's simply the BEST, if you have to carry two bodys. I use two Nikon D700 (w/grip) , 24-70 f2.8, 70-200 f2.8 VRII , and sb900. anyone that walks around at an Event or Wedding with this gear knows how heavy it can get.  
Problem solved with this strap.  It just Works!
Comfort and Shooting ease.  With PRO durability.  This product is made to last.

B&H  listing $129.95:
http://www.bhphotovideo.com/c/product/645448-REG/Black_Rapid_RSD_1BB_RS_DR_1_Double_Strap.html

YES! this DR-1 comes with the New "Solid"  D ring  FastenR3 !
(I just got one in the mail from B&H)
imho, it is a Huge change. It allows you to "easily" Clip and Un-Clip the bodys with ONE HAND (because the D-ring is a solid piece, and does not move (it was harder to do with the old D-ring). And the Rubber compression washer is thinner and harder = Much better!  (the old washer was spongy and thick = junk)

And I think the clip part is slightly better too. I prefer to keep it not locked, for easy/fast Un-Clip.
* the screw section seems smoother to operate,
* the clip harder to mistakenly Un-Clip on it's own when it is not locked (a good feature for me)... I think slightly deeper curve/hook.

The Solid D-ring also helps with a fast Clip on.
B&H  LINK to just the NEW D-ring clip  , FastenR3 for $ 13.95  ... if you want to update your OLD  DR-1 , or any Black Rapid strap , really. :)
http://www.bhphotovideo.com/c/product/684526-REG/Black_Rapid_FR_3.html


Because of the great reviews, I also bought the Joey J2 Pocket $ 22.00 , so I can keep my Moble Phone close to my ear. and it's nice to be able to keep my phone in a higher pocket and not in my shorts when doing a beach shoot. :) fyi: it fits the New My touch 4G moble phone. and it seems to have a place in front to clip on a pen, so you can have a note pad too.
http://www.bhphotovideo.com/c/product/664879-REG/Black_Rapid_RMJ_2BB_JOEY_J2_Pocket_Medium.html


Simply put, this Black Rapid Double Strap is worth every penny :)

That's why I did not hesitate to buy another.

HERE's a  BackRapid  "Capture Life"  Video  ...   I LOVE my Double strap !
This really show's how it works in action,  it brought  tears to my eyes LOL
http://www.youtube.com/user/rstrapvideos#p/a/u/1/bamR-_v6r-w

A no brainer purchase.

Ross D. Hamamura
http://www.rdhphoto.net/
The   Tourist of Light

Monday, January 3, 2011

DNG, why I use vs RAW NEF

Every few weeks you always see a thread about "WHY DNG" ?

First it's Adobe :)
My most used programs are Lightroom v3.3 and Photoshop CS5 for images ... both Adobe.  duh :)

I have been using DNG  from the first Lightroom Beta  ... that is how much I trust Adobe to come thru on this format.
and imho,  Adobe has come thru with support and development of DNG over the years.

Recently, I have not been keeping up with Adobe development on DNG.
But, here is what I just discovered today.

* DNG  now carries within it  pretty much all the Edit information you need in the one DNG file.  imho, when you are working across a network , with multiple computers , Hard Disks , file formats ... the last thing you want is more than one file for a single RAW file .. we don't need those "stink-ing" sidecar files, that you get with a NEF in LR :).  DNG consolidates everything into one file for me.
And you can inbed the original RAW into the DNG if you want.  I do not.  I do not even keep the old NEF.
Never have, Never will....  and in all the years since the Lightroom Beta I have never had a single problem with a DNG.

My big gripe "Before"  v3.3 of Lightroom (which I have expressed on the Adobe forum) ... was it did not have the "Crop"  information from Lightroom in the DNG.  and working with Lightroom across a Network was not always , what you would expect.

* But, today I was on my laptop ...  I went across my WiFi Office network , in Lightroom v3.3 ... imported my DNG files that was partially worked on ...
and AFTER the import  ... Lightroom brought up  ALL my previous edits ,  Star ratings ...   and CROPs (something it did not do before, "crops")   ... 
Not sure what version of Lightroom or DNG this changed , but  this was a  happy discovery today.

At this point ,  I am not sure if it is better Networking support in Lightroom v3.3 that is doing it ... or the DNG  information that is being stored.  
My guess is that it's in the DNG  ... because that is all I did.   Import the DNG files.

Another cool discovery is ... I can keep my edits local ... OR  save my edits to the original DNG file "across the network".

and on the "other side"  I can  Keep my Local Edits , OR  "READ" the original file  (if I have made changes to it).

Sounds complicated ,   it's not  ...   and if you work with files across a Network and do Edits on more than one computer ... OR have an assistant working on "your" files on a network  ... you will know what I am talking about.

So,  I was happy with DNG before  ... now I am even more confident in my decision to  convert my RAW Nikon files to DNG and delete the original NEF.

***  Other notes:

On a D700  a  DNG file is actually Smaller than a NEF
NEF = 15.3
DNG = 14.0 Med JPG inbed
DNG = 14.9 Large JPG inbed

When I shot OLY ... the differance was larger. the  ORF OLY raw was "much" larger than a DNG.

* Interesting info on RAW and DNG  (you can go down to the DNG section)
This artical is from 2009  ... things might have changed a little, but still an interesting read.
http://www.libraw.org/articles/2-ways-to-nowhere.html

*  on Keeping NEF , just to be safe:
or NEF's, keeping something you never use:

This is interesting ... because I have never felt the need to get any information from a NEF that I did not have in a DNG.

and then, if the image is really important to me ... I would have probably worked it in a PSD file. So, I also have another copy there too.

When I really think about it ... how many times have you gone back on a RAW file.
(yes, when LR went to v3.3  I have reconverted some of my old DNG D700 files shot at very high ISO , for a cleaner  noise processing from the Newer version of Lightroom ... but really anything at or below iso1600 was so clean I did not bother lol  ....  that being said,  a D700 DNG processed in LRv3.3 has a 1-Stop improvement of Noise processing vs LR v2 (Adobe rebuilt the processing, and gives you a choice to go with the OLD process or NEW , always go with the NEW) , and the sliders are new and improved , and gives you more control ... that's almost like "upgrading" the already great Nikon FF sensor)

and do you really believe the DIFFERANCE between a DNG file and NEF will be a deal breaker???  Really?

Some client will walk up to you and say ... Hmmm , did you process that RAW from a NEF or DNG? , it looks like you lost some bits of data.

imho, I think it is enough that I am "already" saving my RAW data at 14-bits. and going out to PS CS5 in 16-bit ProPhoto color space (native to LR)
any bits of data that I lose from a NEF to DNG conversion ... I probably have not missed , and certainly did not notice.
Note: I also trust that Adobe will continue to improve this.  Why?  guess what group of  photographers use Lightroom and DNG ...  PRO's,  and they are a vocal bunch :). 
So, in general ... I feel pretty safe.

Any BIG changes that I "really" notice ... happens AFTER the RAW conversion to DNG ... in LR or CS5. Maybe that's just me.

* For me, IF, you are saving your RAW files at "16-bit" , you probably plan on doing some CHANGES ... and "those changes" are what is important to you.

and you ("Me" actually) might not even be concerned with what is "real" or perfectly real (but, it helps, ONLY as a starting point).
a side note: If you "only" show what is real. Are you not "limiting" what you can can express?   limiting what you show as your vision, your feelings of what was there?   and is "that" being creative?

For me, I  just need to get it in there FAST , with a FAST workflow ... and have it Malleable , so you can shape it to your own vision.

I am also a "Expose To The Right" (ETTR)  RAW shooter ... so, my OOC (Out Of Camera) JPGs is not what I end up with, just to begin with.

Hope this helps someone,
Ross Hamamura 
Tourist of Light  :)
http://www.rdhphoto.net/

Tuesday, December 21, 2010

Kelia Moniz @ North Shore

Have not shot surf in a very long time.  So, when the opportunity to go out with the Eyes of Hawaii Photography Club, to shoot and hang with (PRO Surf Photographer, Surfer mag) Tom Servais.  Well, I had to wake up early to make the drive to Pipeline (the meet up spot).

Early morning the surf report was basically 1-2  ... was not expecting much  ... so, my plan was to shoot something on the beach or close to shore with my  Nikon 70-200mm f2.8 , and just have fun.
Knowing full well the last time I was at Pipeline I had a 600mm f2.8 and a 1.4 TC (imho, what you need)

So, here we are not expecting much in the low surf  ...  and then, Tom recognizes Kelia Moniz out right in front of us.  Well ....    that changed things LOL   (as I kicked myself for not having something longer, lens wise)

My go to sports lens , the 70-200 f2.8 VRII  "Rocked it"  as usual (normally, I am pretty close to the action ... did I say "All Access Pass?" lol) ... So today, anything out in the Surf had to be heavily croped.   Or I had to shoot something up close to shore.   Which Kelia came thru for me. She was always natural, beautiful and genuinely happy to be out there in the surf (you could feel it).

She made everyone's day (with a camera), at that location.  :)

Normally I shoot f5.6  @600mm  (and maybe 900 with a TC)  ... today I was at f4 , because of Kelia (girl).   And unfortunately, only 200mm ... So, I had to make the most of it.  (that means a lot of standing at the shoreline lol.

More images in a gallery here:
(I also think the images look better in this gallery, in Slide Show mode= more res)
http://www.rdhphoto.net/Other/Kelia-Moniz-plus-North-Shore/15160159_FKMxC#1133819528_osvbi


a few of the Eyes of Hawaii Photography Club , Kelia Moniz and Tom Servias on the board in front.

Hope you enjoy this ...
Ross Hamamura / Tourist of Light
http://www.rdhphoto.net/

Saturday, November 20, 2010

Sato's Okazuya Saimin Stand ... Best Fried Saimin :) ... and a Big Kahuna bonus shot


Sato's Okazuya Saimin Stand
94-235 Hanawai Circle
Waipahu, HI 96797-3029
(808) 677-5503

This is my favoite Fried Saimin.
 
I have been shooting more and more Resturant AD's lately  ...
So, I need to say this first   ... I will not be blog-ing on any of those paid shoots.
Just so you know.  This was "not" paid.
 
Will post some Resturant AD  images on my site  (RDHphoto.net) at some point.
 
Was in Sato's the other day  .. a hole in the wall place.
Had to wait in line for way too long. 
It's one of those places with old posters on the wall ... and stuffed animals in there glass case.
Don't ask me why they do that! :)
 
But, their Fried Saimin  ...  WoW!
I told another photog  that when he is on Oahu ... I will take him here.
So,  here is my blog on them ...  in case you need to find your way back  LOL.
 
Just so you know  ... normally I order the  Large Fried Saimin    $7.00
 
But, the two pics on this page   are of there  $6 - $7 plate lunches with Fried Saimin (instead of Rice)
The Fish  is pretty good too. 
 
Shot this natural light  ...  right at my table   ...  "Why Not"  :)
If you know me  ... you know  I am not a natural light shooter, for this kind of stuff 
 
The shots was "not bad"  ... it is, what it is ....  and kinda fit to the  Mom & Pop place, it is.
No Food Stylist  here  ...
 
Ross Hamamura  / http://www.rdhphoto.net/
"Tourist of Light"


Here's a little bonus pic  ...  just because I was also there recently ...
When at the  Airport  ... Flying out or in.  

I always pick up a  Panaolo Beef Briskit Sandwitch (think that's the name) with extra sause, and/or the Garlic Balls .. and the Pizza is good too. :)

Da’ Big Kahuna’s Pizza ‘N Stuffs

550 Paiea Street in the Airport Trade Center
Honolulu, Hawaii 96815

Tel. (808) 833-5588
 
Well, what might be interesting to some is the exif of this shot:
f8, 70mm,  iso6400  ... and I still only got  1/40  ... and this was during the day.
This is straight out of LRv3  ... I should mention also ... there is a one stop improvment on LRv3 vs LRv2 on noise, on the D700  RAW file processing.
imho,  a  good iso6400 matters :)   ... a year ago (pre-D700)  I would have never even entertained the "thought" of bumping to iso6400.
It has saved me on many "handhold's".  
(I am not a tripod guy ... even on a comercial Food shoot .. I try  sometimes ... but, I always end up not using it lol)
 

Wednesday, November 10, 2010

Lighting Class Set up ... what I like

Ok, so I have not blogged in a while :)  ... it's been busy ... and I am backed up on my shoots (it's a RAW thing lol)
and ...  I learned a few things on the Kona IronMan World Championship shoot ... but, that's another blog lol.

Just organized a recomendation for a Lighting Class Set Up
So,  as I tweak it  ... thought to Post it ... so I can just  LINK to it  ... when someone asks.

Here it is:

Style Number / Description /  Qty /  Cost / Total COST /  Web Link     (it was on a excel file)


MPEX.com

SX3 Lighting Kit Strobist Starving Student SX3 Lighting Kit
 1    $489.99      
http://www.mpex.com/browse.cfm/4,12841.html

(this includes two LP160 Flashes .. and pretty much has everyting you need to start)

LP160 LumoPro LP160 Manual Flash
2     $159.95           = $319.90
http://www.mpex.com/browse.cfm/4,14648.html


(If you don't have two flashes already … you will need four total)

LP633 LumoPro LP633 Umbrella Swivel w/ Flash Shoe Adapter
2       $17.99      = $35.98
http://www.mpex.com/browse.cfm/4,11776.html

This is my favorite Umbrella swivel ... because it packs small and is strong. (both important when traveling)


B&H

PHPDBDSK Photoflex Pro-Duty Backdrop Support Kit
2       $199.99     =$399.98
http://www.bhphotovideo.com/c/product/556182-REG/Photoflex_DP_SHDBGSPKT.html


This is a PRO Backdrop Stand set at 12'6" Tall , very useful ... and has a bag, AND is not any more for the bag and cross bar ... a relative value. :)

UM-RUT45 Photoflex Convertible Umbrella - White Satin with Removable Black Backing - 45"
2         $29.95        =$59.90
http://www.bhphotovideo.com/c/product/42505-REG/Photoflex_UM_RUT45.html

Look at the Reviews on this Umbrella  ...  5 stars  ... and you will know why I love these.
You can take off  "just" a  section of the Black Backing  ... and shoot thru the open section.  Nice!
* Photoflex has also changed the "ribs" on this Umbrella ... to a  Nylon/plastic looking materia (=flexable, yet firm enough)  .. THIS little new feature, will save you when your stands fall over in the wind.  And they "WILL"  lol.  It's just a matter of time.

It's a  "Love It"  new feature.


RadioPopper

JRX-KS RadioPopper JrX STUDIO KIT
1        $159.95
http://shop.radiopopper.com/radiopopperjrxstudiokitusca.aspx

JRX-RS RadioPopper JrX Receiver STUDIO
3         $99.95     =$299.85
http://shop.radiopopper.com/radiopopperjrxreceiverstudiousca.aspx


* What is great about this JrX Radio triggers is that they are ROCK solid and work with anything with a Hot Shoe.

* AND can control the Power level of AB studio strobes

Have done a blog on these already  ... I own BOTH the  PX and JrX studio versions of these Radio Triggers    ...  So, you know that I  LOVE these!  and they work  ALL the time, Period.
No Way are you going to find something more reliable than these.   (and more so , for this price)
I have owned the JrX Studio on the first shipment from RP ... and the PX triggers a month after that (because I was sooo impressed)  ... both of these radio triggers have "never" dissapointed.


Thomas Distributing

MH-AAI240 MAHA IMEDION AA 2400MAH RECHARGEABLE BATTERIES 4-pk LOW DISCHARGE
4 packs @ $10.97    =$43.88
http://www.thomasdistributing.com/shop/maha-imedion-aa-2400mah-rechargeable-batteriesbrultra-low-dischargebr4-battery-pack-nimhbr1-free-four-cell-battery-case-p-2096.html?SP_id=&osCsid=u53ohoomk1is3j4dga59jufu46


K-MHC801D-BC MAHA MH-C801D AA - AAA 8 BATTERY PRO CHARGER
1        $68.67
http://www.thomasdistributing.com/shop/maha-mhc801d-aa-aaa-battery-chargerbrdeluxe-8-cell-professional-battery-charger-w-full-lcd-displaybrbrfree-accessory-bag-2-free-eight-cell-battery-holdersbrspecial-price-6897-p-437.html?SP_id=&osCsid=u53ohoomk1is3j4dga59jufu46

* I own the cheaper 800S version of this 8-battery PRO Charger  ... because of the smaller  plug for Travel (trust me, things add up) ... and the lower cost  ... and that it was the newer version  ... but,  Thomas Dist.  does not have it listed right now.  (11/10/10)
 
Have two(2)  4-battery 401FS  and a 800S 8-battery PRO Charger ... and they are plugged in all the time. :)
p.s.  I love the  Thomas Dist.  8-battery  case they give away free with the 801/800s chargers.  They are now my fav.
 
Oh,  just in case you need Roll paper for your Backdrop stands ... on Oahu, Hawaii
Attco Inc  ... a  staging supply company near Lagoon Dr at the Airport
Aprox.  $50  for a Roll  .. about 9 feet wide (forgot how long, but it's enough)  ... they have many colors
The roll box is not huge, so it's not that hard to carry with you (or your van).
I like it better for White, than fabric/muslin (which I have Black and Green/Blue)  particularly in white because you don't have to  steam before use , and when it gets dirty or ugly you can just tear it off  and when you roll out a new section it is sooooo  Smooth and White :).     nice!
http://www.attcoinc.com/


Sandbags (the bag part) from B&H ... so, my lightstands don’t fall over ... you could use other things.

also, note ... they are bright orange ... imho this is important ... so people can see it and don’t trip over it.
http://www.bhphotovideo.com/c/product/421469-REG/Impact_SBE_18O_Empty_Saddle_Sandbag.html


Should also buy some large Plastic Clips from Lowes in Hawaii ,
Bessey XC-14pc  $ 12.98    ... to hold the Roll paper in place :).
This is a Big nylon bag of 14 Plastic Spring Clamps ... 2 - 3in. (which is huge), 2 - 2 in. , 4 - 1 in. , and 6 - 3/4 in. which are cute, small, and moderately useful (and you will not mind if you lose them)   they do help pin a green screen flat on backdrop stands. :)
At Amazon on the web:
http://www.amazon.com/Bessey-XC-14PC-Piece-Plastic-Spring/dp/B003XO0MLM


Hope this helps someone,
Ross Hamamura   ...   Tourist of Light
http://www.rdhphoto.net/

Thursday, August 26, 2010

SanDisk Extreme PRO ExpressCard Adapter install in Win7 PRO 64-bit

SanDisk Extreme PRO ExpressCard Adapter install in Win7 PRO 64-bit  ...

* Here's a Important tip you might miss ... even though it is right on the install CD:
You MUST have both the CF (Compact Flash Card) AND the SanDisk Extreme PRO Adapter in the ExpressCard Slot  BEFORE  you start the Installation CD !

It will not run the install without it.

But, if you do that ... it will install quickly and flawlessly  on a  i7 Quad Core Laptop running Win7 PRO 64-bit OS.    Zero issues.
And YES,  it's  FAST !   Period.

I already know it's FAST.    Have read others tests ( http://www.robgalbraith.com/bins/content_page.asp?cid=7-10043-10255 )
But, there is nothing like doing a test yourself.   Even though you know it works well.  It's nice to stress it a little.

So, first thing  I do is format two of my SanDisk Extreme PRO 16gb CF cards in different D700's.
Both, format to 14.9 gb.
Then I upload  14.9gb aprox  to both CF cards   (which left 96kb open on both cards)
Interestingly it takes more than twice as long to upload to the CF (11:16 min) using the ExpressCard Adapter as it does Downloading to the Laptop 7,200rpm HardDrive , guess it should not be a surprise because the HD is fast, with a large cache.
Laptop is a 17" 1080p ASUS i7 quad core , two(2) 7,200rpm hard drives C: , and D:  ... with a ExpressCard slot 34. running Win7 PRO 64-bit.

* I should note  ... that I can see why others feel the CF slot guides are too short.  IF, you are not careful you "could" damage Pins on the Adapter/Reader.
Another small critique is the ExpressCard sticks out of the Laptop far enough away that it could easily get damaged imho.

My advice is to always:  Put the CF card into the SanDisk ExpressCard Adapter "FIRST" , then ...  put the ExpressCard Adapter into the ExpressCard 34 slot in the Laptop.
imho, it helps with two issues ...   the short card guide (that could damage your pins) ... and,  sometimes you might loose your ExpressCard Drive listing in Windows.
* but, it is easily solved by taking out and putting back in the ExpressCard Adapter.

Loading it this way , Kills two birds ... with a sensible technique of loading the CF.

One thing good about the design is , it does look like it will pack easy.   My only small concern is it's durability in a bag with other stuff.
The weak link seems to be the  metal to plastic connection , right where it sticks out of the Laptop.

Ok, now the Fun part ...   my TEST results.
fyi: after each  Copy from  Extreme PRO CF  to Laptop   ...  I did a  Delete >>>  Clean Recycle bin >>. then a full shut down and Start up.

Copy being done in Win7 Pro 64-bit and PowerDesk Pro (file Manager).

1)  SanDisk Extreme PRO 16gb CF  and SanDisk Extreme PRO ExpressCard Adapter  via Copy to Laptop  took  5:07 min and 5:00 min on the re-test

Anyone that has had to download this amount (14.8 gb) of  DNG, NEF, JPG  knows how long this could take.
* This is  FAST !    Real  FAST !

When you are downloading on location  ... this kind of Speed makes a differance.
You will notice this kind of speed  way before  the  in camera speed of this card on a Nikon D700/D3 ... shot to shot.  (even though the speed is there, even in camera)

Note: I mainly care about  CF to Laptop download speed.   
I already know the  Extreme PRO CF is way fast enough on a D700 for every day shooting.  measuring it does not matter to me.

2)  Now my old All in One USB Reader ... SanDisk ImageMate 12 in 1 USB and the same CF card  ...  it does all kinds of cards ...
It's time was a painful  17:40 mins.  and 17:29  on the re-test.

3)  Internal Multi Card reader on a i7 quad core Dell XPS with two fast 7,200 rpm Hard Drives  ... now this was a surprise because I normally do not watch the download.
31:47 mins !    ...  I only did   this once.   That was enough.

It's time to look for a ExpressCard Reader slot  add-on for my Desktop ... I think.


The combo of the SanDisk Extreme PRO CF and SanDisk Extreme PRO ExpressCard Adapter  was sooo Fast it was not even close.

When you have a Need for Speed.  
This combo is it ! ... 
SanDisk Extreme PRO CF and SanDisk Extreme PRO ExpressCard Adapter in a ExpressCard 34  slot.

And based on my prior experiance with SanDisk Extreme CF cards and the new SanDisk Extreme PRO CF 16gb  card  since Nov. 2009    ... these Cards are very reliable. With very good support.


Your in camera speed might be different depending on your Camera's support for UDMA 6.
So, watch for the  gotcha  there.

Hope this helps ...

Ross Hamamura      http://www.rdhphoto.net/
The Tourist of Light      :)